Saat ini mungkin yang sedang Anda pikirkan adalah: “Saya harus mulai berpenghasilan melalui online!”. Atau pikiran seperti ini sudah lama ada di benak Anda, tapi dengan mengesampingkan kondisi telah menjadi bagian dari komunitas online atau bisa dibilang Anda masih belum beranjak dari posisi semula. Atau bisa jadi, memang Anda telah menghasilkan uang online tapi masih menghindar untuk menghasilkan lebih banyak lagi.
Seperti kebanyakan Anda, Jeremy Schoemaker, dulu sudah pernah masuk ke semua kategori tersebut. Sekarang, dia dikenal sebagai ‘Shoemoney’ (karena alasan yang sangat jelas, menghasilkan uang). Ada yang harus kita ketahui faktor-faktor terpenting yang harus diingat dalam menghasilkan uang online.
Dalam video wawancara dengan Abby Prince, Jeremy menjelaskan dengan sangat spesifik mengenai blog dan bagaimana melakukan monetize blog. Menurutnya real money di blog ada di affiliate network. “Jika ingin ngeblog tentang suatu tema dan ada link di dalamnya” Kata Schoe, “pastikan untuk dianggap penting agar mendapatkan link.”
Berikut cuplikan dari wawancara yang sangat informatif bagi siapa saja yang sedang melakukan bisnis online, tidak hanya sekedar bloger. Dalam usaha menghasilkan uang, Anda perlu mengesampingkan atau tidak menomersatukan uang dahulu. Menurut Jeremy, ditujukan bagi para bloger bahwa tujuan utama para blogger adalah mendapatkan pembaca (reader) baru dan meningkatkan jumlah RSS subscriber.
Jika hanya posting tulisan atau melakukan blog entries tentang apa saja yang diinginkan affiliate membayar rate paling tinggi hari itu, pembaca Anda akan dengan cepat bosan, mereka akan merasa ada yang kurang, lapar akan info terbaru. Ini kebenaran bukan hanya untuk para blogger saja tapi siapa saja yang memiliki website dan segala bentuk iklan – affiliate atau yang lainnya.
Jeremy menekankan tujuan dari para blogger adalah membangun basis pembaca (membangun traffic) dan berhati-hati atas kehilangan basis pembaca ini karena posting promosi yang kurang bagus(bad/excessive ads).
Kebayakan dari kita tidak bekerja secara nyaman diakhir pekan. Disaat yang sama, harus diingat bahwa subscriber, pembaca, end user atau customer tidak menggunakan internet hanya untuk kesenangan membaca saja dan mengklik link yang ada dan mendatangkan uang untuk Anda.
Beriklanlah. Buatlah konten yang benar-benar menarik perhatian Anda, menarik perhatian pembaca juga. Kemudian gunakan affiliate link yang relevan dan atau jual space iklan ke sponsor yang cocok dengan konten Anda.
Traffic akan datang karena content, bukan untuk mendatangkan uang untuk Anda. Jika user yang berharap akan content berkualitas menjadi berkurang karena content Anda sangat mengarah ke promosi sekali… mereka akan pergi menginggalkan Anda.
Jika Anda bangun di pagi hari dan menemukan bahwa traffic and mengarah ke jurusan yang salah… cobalah untuk melihat dari sudut pandang para user. Apakah site Anda memiliki lebih banyak sponsor atau banner dibanding ajang balap mobil NASCAR? Pasti ada masalah. Priotitas dan eliminasi. Apakah Anda memiliki iklan dan link Secure Servers dan Web Hosting dalam site furniture Anda? Saya tidak ambil pusing berapa mereka mau bayar berapa… tapi ini mengancam kredibilitas Anda dalam jangka panjang… dalam hal ini keuangan. Coba cari sponsor yang selaras dengan konten site. Mungkin mereka membayar lebih sedikit, tapi mereka tidak akan membuat basis user Anda lari.
Jadi ketika Shoemoney mengatakan rahasia terbesar dalam menghasilkan uang adalah simpan dulu uangnya… inilah yang dia maksudkan. Basis user Anda adalah komoditi terbesar Anda. Jika Anda memelihara basis user, mereka akan memelihara Anda juga. Membangun basis user merupakan pekerjaan berat. Apakah Anda mau mempertaruhkan mereka hanya karena sedikit ekstra dolar setiap bulannya?
Kesimpulan : ketika anda memutuskan membuat web/blog maka jangan niatkan dulu untuk mencari uang namun harus berdasarkan hobby sehingga konten di web anda akan selalu update, menarik dan dikunjungi ulang tiap harinya. Ketika web anda sudah memiliki pelanggan (basis user) meskipun baru sedikit maka itulah saatnya me-monetize web anda melalui berbagai cara : join google adsense, jualan produk sendiri, jualan banner/iklan, ikut affiliasi dan lain sebagainya.
Sumber : seokita.com
Tulisan ini bersumber dari http://www.successkid.com/rahasia-monetizing-site-membuat-web-anda-jadi-mesin-uang
Minggu, 08 Agustus 2010
Kamis, 06 Mei 2010
Cara Membuat Kotak Ngoceh atau Shout Box
 Kotak ngoceh atau istilah lainnya shout box, Say Box, Tag Board, dan Chatter Box adalah suatu kotak yang berfungsi untuk mengirimkan pesan-pesan pendek, namun bisa juga berfungsi sebagai tempat ngobrol (chatting). Dengan shoutbox, kita juga bisa mempromosikan blog kita, misalnya nih, kita datangi blog orang yang menyediakan kotak ini kemudian kita kasih komentar atau cuma sekedar salam di shoutbox mereka, lalu yang punya blog akan melihat di shoutbox, biasanya meraka akan balas mengunjungi blog kita. Nha gitu ceritannya. Biasanya kotak ngoceh diselipkan kedalam halaman web/blog dengan bahasa java Script. Bagi kamu yang jago pemrograman java script mungkin bisa membuatnya sendiri dengan membuat kode-kode yang memusingkan kepala. Namun buat kamu yang nggak jago nggak usah kuatir karena sekarang ini banyak situs internet yang menyediakan layanan ini, salah satunya yaitu Shoutmix .
 Caranya adalah sebagai berikut :
1. Buka situs Shoutmix Kamu harus mendaftar di situs tersebut, cara daftarnya gampang kok.
2. Jika pendaftarannya berhasil kamu langsung disuruh milih type shoutbox yang disediakan, terserah kamu milih bentuknya yang gimana. Klik tombol Continue
3. Setelah itu kamu akan mendapat ucapan "Terima Kasih" :D lalu klik link Go to My Control Panel Now
4. Disitu kamu bisa mensetting terlebih dahulu shoutbox kamu, misalnya Style & Color, Date & Time, dan lain-lain.
5. Jika sudah selesai klik menu Get Codes
6. Jika kamu pingin menaruh shoutbox di blog kamu pilih "Place Shoutbox on Webpage"
7. Atur lebar dan tinggi shoutbox di kolom widht dan hight
8. Kemudian Copy kode yang ada di dalam kotak "generated Codes"
9. Login ke blogger.com lalu pilih Layout kemudian Add Page Elements
11. Tambahkan element HTML/Javascript.
12. Paste Kode yang telah kamu copy dari shoutbox.com tadi di kotak "Content" lalu simpan.
13. Jadi deh.....
dikutip dari http://tips-triks.blogspot.com
Sabtu, 06 Maret 2010
Cara Mengedit HTML Pada Blogspot
 Jika kita mengotak-atik atau mengedit HTML blog kadang2 akan mengalami kesulitan, apalagi bagi yang masih agak pemula. Entah itu gak bisa nemu kode yang mau diedit lah, gak bisa disimpan karena error lah, Ada pesen error yang gak jelas lah, dan lah-lah yang lain, ya to...??? Nha trik dan tips kali ini akan mencoba gimana cara untuk mengatasi atau setidaknya mengurangi masalah "lah-lah" yang kadang2 atau sering terjadi tersebut. Berikut ini beberapa tips untuk edit HTML bogger:
1. Backup Template
Membackup template ini penting karena jika terjadi hal-hal yang tidak diinginkan, misalnya blog jadi rusak maka kita bisa membuatnya seperti sediakala (sebelum rusak) jika kita sebelumnya sudah membackup template. Cara membackup template ini mudah. Cukup klik pada link "Download Full Template" lalu simpan file template di komputer kita. Kalo terjadi kesalahan yang tidak bisa kita atasi, kita tinggal upload aja file template tersebut.
2. Memberi Tanda Centang pada Kotak "Expand Widget Template"
Ini yang kadang2 dilupakan para "editor". Kalau kotak "Expand Widget Templates" tidak dicentang maka kode2 yang dicari kemungkinan tidak ditemukan. Tapi kadang2 hal ini tidak perlu dilakukan tergantung dari petunjuk tutorialnya. Makanya perhatikan baik2 tutorialnya kalo mau Edit HTML blog.
3. Tips Mempermudah Pencarian
Untuk mempermudah pencarian kode yaitu dengan meng-copy dulu kode yang mau dicari kemudian tekan "Ctrl+f" lalu masukkan kode yang dicopy tadi kedalam kotak yg muncul. Kalo misalkan kode yang dicari tidak muncul maka cobalah mencari sebagian dari kode tersebut. Misal mau mencari kode
4. Tips Menghadapi Error Yang Muncul
Jika saat menyimpan hasil editan kemudian muncul pesan error, misal seperti ini:
We were unable to save your template
Please correct the error below, and submit your template again.
Your template could not be parsed as it is not well-formed. Please make sure.....
Maka hal yang harus kita lakukan adalah berusaha memahami pesan error tersebut. Kemudian kita cek kembali tutorial yang kita baca apakah langkah-langkah yang sudah kita lakukan bener2 sesuai dengan tutorialnya. kalau tidak yakin maka kita bisa mengulangi lagi tutorialnya dari awal dengan mengklik tombol "Clear Edit" terlebih dahulu.
Sabtu, 13 Februari 2010
Understanding Domain and Hosting
In the world of website or blog, certainly you often hear the term of domain or hosting. Domain and hosting are the essential things for a website or blog. Therefore, let’s know and understand what domain and hosting are. For those of you who are not familiar yet with domain and hosting, below is the discussion that will deliver to you.
Domain
In creating a website or blog, you are obligated to have the domain. What is domain? Maybe you have ever heard about this term in other fields such as math or others. If we observe the general definition, domain means a place or the territory. It will be the same as in the internet; you need to have a place for your website or blog. To differ from one domain with another domain, the domain should be given a name, or we call it the domain name, e.g. http://gemaanekaiklan.blogspot.com, http://cugr.blogspot.com, http://modulkuliah.blogspot.com, etc. In the popular term, the domain name refers to Domain.
The Domain name is various according to the goal of a website created. The types of domain are specified with the words after it such as:
• .com ( read: dot com ) : for commercial website
• .org : for organization website
• .info : for website contains information
• .biz : for business website
• .gov: for government’s website
• etc
There are also domains tend to territory:
• .us : for website in the United States (US)
• .co.id ( read : dot co dot id ) : for website in Indonesia
• .cn : for website in China
• .co.il : for website in Israel
• .my : for website in Malaysia
• etc
However, in the practical, the domain names are no longer for the specified identities, for instance, the domain name ends with .org, used for personal website not for an organization, domain name ends with .info, used for commercial, and so on.
To purchase the domain, you can buy it at the websites that sell domain. This purchase is not permanent, but for a period in years (usually, the price will be for one year). Or precisely, we hire the domain, not buy. But it is more popular to buy a domain not hire a domain.
In the domain, there’s something called Sub Domain (part of domain). The Sub-domain is created of the main domain. The Sub domain can be identified from a separate written by dot (point). For instance, the main domain is kangrohman.com, we can create the sub-domain as blog.kangrohman.com, tool.kangrohman.com. Or the real example for you is like kolom-tutorial.blogspot.com. Main domain is blogspot.com and the sub domain is kolom-tutorial.
Hosting
If you have bough a domain and you access the domain, it will be a blank page. In order to fill out the domain, we will need a hosting to store the database, web machine, etc.
An easy illustration, domain is like a computer and hosting is like the electricity. Both are to support each other. Or another example, the laptop with its battery. So, a website should have the domain name and hosting so it can be accessed by public.
To create a webhosting, you will need the very expensive tools, therefore, a webhosting company are present to give the space or bandwidth. You can find many webhosting companies on the internet.
Hiring a webhosting is usually fixed to 3 months, 6 months, 1 year, 2 years, etc. One webhosting is certainly different from another one.
That’s all today’s post. Next posts, I’ll try to discuss about how to buy a domain, select domain name, select the right hosting, etc.
If there’s a mistake in writing and explaining about domain and hosting, please correct. Thanks.
Sumber : blog.kangrohman.com
Domain
In creating a website or blog, you are obligated to have the domain. What is domain? Maybe you have ever heard about this term in other fields such as math or others. If we observe the general definition, domain means a place or the territory. It will be the same as in the internet; you need to have a place for your website or blog. To differ from one domain with another domain, the domain should be given a name, or we call it the domain name, e.g. http://gemaanekaiklan.blogspot.com, http://cugr.blogspot.com, http://modulkuliah.blogspot.com, etc. In the popular term, the domain name refers to Domain.
The Domain name is various according to the goal of a website created. The types of domain are specified with the words after it such as:
• .com ( read: dot com ) : for commercial website
• .org : for organization website
• .info : for website contains information
• .biz : for business website
• .gov: for government’s website
• etc
There are also domains tend to territory:
• .us : for website in the United States (US)
• .co.id ( read : dot co dot id ) : for website in Indonesia
• .cn : for website in China
• .co.il : for website in Israel
• .my : for website in Malaysia
• etc
However, in the practical, the domain names are no longer for the specified identities, for instance, the domain name ends with .org, used for personal website not for an organization, domain name ends with .info, used for commercial, and so on.
To purchase the domain, you can buy it at the websites that sell domain. This purchase is not permanent, but for a period in years (usually, the price will be for one year). Or precisely, we hire the domain, not buy. But it is more popular to buy a domain not hire a domain.
In the domain, there’s something called Sub Domain (part of domain). The Sub-domain is created of the main domain. The Sub domain can be identified from a separate written by dot (point). For instance, the main domain is kangrohman.com, we can create the sub-domain as blog.kangrohman.com, tool.kangrohman.com. Or the real example for you is like kolom-tutorial.blogspot.com. Main domain is blogspot.com and the sub domain is kolom-tutorial.
Hosting
If you have bough a domain and you access the domain, it will be a blank page. In order to fill out the domain, we will need a hosting to store the database, web machine, etc.
An easy illustration, domain is like a computer and hosting is like the electricity. Both are to support each other. Or another example, the laptop with its battery. So, a website should have the domain name and hosting so it can be accessed by public.
To create a webhosting, you will need the very expensive tools, therefore, a webhosting company are present to give the space or bandwidth. You can find many webhosting companies on the internet.
Hiring a webhosting is usually fixed to 3 months, 6 months, 1 year, 2 years, etc. One webhosting is certainly different from another one.
That’s all today’s post. Next posts, I’ll try to discuss about how to buy a domain, select domain name, select the right hosting, etc.
If there’s a mistake in writing and explaining about domain and hosting, please correct. Thanks.
Sumber : blog.kangrohman.com
Senin, 25 Januari 2010
Tutorial to Create Blogger Template
 This tutorial is to create simple blogger template, with simple methods. The easiest way to create blogger template is by edit a template. But don't worry, although this is a simple methods but it can produce a beautiful template, it depend on how you design it. This tutorial is not to create blogger template from beginning but this is to create template by editing an available template.
 Well, lets begin. Before we begin I suggest you to create a new blog, I don't wont to destroy your blog. To follow this tutorial you have to download this template first. We will create a template that contain four main elements, (Background, Header, Main and Footer). So you have to create the four elements, You can use Image editor software like Adobe Photoshop, CorelDraw, Paint, etc.
Here's the detail to design it:
- Create a design like above image.
- On the background part it should be a Pattern/Tile.
- Cut for every part (Background, Header, Main and Footer) it should be like this :
- background
- header
- main
- footer
- Upload your part image on the webhosting or on the image hosting like photobucket.
All right, now we will arrange these part to the HTML.
1. Go to blogger then go to "EDIT HTML" menu.
2. Click on the "Brows" button to upload above template or this template
3. Find this code
body { margin: 0px; padding: 0px; text-align: left; font:$bodyfont; color:$textcolor; background: #323232 url('http://blogoholic.info/files/bg.jpg') repeat-x top left; }
4. Change the bold text with your image location
5. Then find this code, and change the blod text with your image location :
#center {background: #ffffff url('http://blogoholic.info/files/body.jpg') repeat-y top center;}
6. Find the code below and change the bold text with your image location:
#header { margin: 0; height:196px; width:898; color: $pagetitlecolor; background: url('http://blogoholic.info/files/head.jpg') no-repeat top center; }
7. Find the code below and change the bold text with your image location:
#footer { margin: 0; width: 898px; height:80px; padding: 0px; background: url('http://blogoholic.info/files/foot.jpg') repeat-y top center; }
8. Now find the code below
#outer-wrapper { width: 898px; margin: 0px auto 0; text-align: justify; }
this code width: 898px it's the width of your blog, change it according to your image.
#main { float: left; width: 445px; margin: 5px; padding: 0px 0px 0px 10px; line-height: 1.5em; word-wrap: break-word; /* fix for long text breaking sidebar float in IE */ overflow: hidden; }
This code width: 445px; is size/width of main, you can change it.
#sidebar { float: right; width: 153px; padding-right: 50px; font-size: 83%; color: $sidebartextcolor; line-height: 1.4em; word-wrap: break-word; overflow: hidden; }
#ads-wrapper {float: left; width: 195px; padding-left: 10px; word-wrap: break-word; overflow: hidden; }
This code width: 153px; is width of your right sidebar. and this code width: 195px; is width your left sidebar. And this code padding-right: 50px; is gap of text on the right sidebar with right line. And this code padding-left: 10px; is gap of text on the left sidebar with left line.
#header { margin: 0; height:196px; width:898; color: $pagetitlecolor; background: url('http://blogoholic.info/files/head.jpg') no-repeat top center; }
This code height:196px; width:898; is height and width of your header, Change it according to your Header Image.
#footer { margin: 0; width: 898px; height:80px; padding: 0px; background: url('http://blogoholic.info/files/foot.jpg') no-repeat top center; }
This code width: 898px; height:80px; is width and height of your footer.
9. Try to modify and preview it until looks good.
10. If it looks good you can save it.
Minggu, 24 Januari 2010
How to Settings your blog?
If your blog want carried by google, you must doing several settings. This is how to setting your blog:
1. Login to blogger.com with your ID.
2. If your blog more than 1, click at the blog title want to setting.
3. Click Setting and then click Basic. Several form that must in the contents to the menu basic:
5. Click Formatting to arrange the formatting menu.
6. Click Comment to arrange the Comment menu.
7. Click ARCHIVING to arrange the archiving menu.
1. Login to blogger.com with your ID.
2. If your blog more than 1, click at the blog title want to setting.
3. Click Setting and then click Basic. Several form that must in the contents to the menu basic:
- Title : Content with your blog title. Example : Blog Tutorial.
- Description : Content with your description blog. Example : All about blogging can find here.
- Add your blog to our listing : chose Yes, so that every time posting always entered the Blogger.com list.
- Show Quick Editing on your blog : Choose Yes.
- Show Email post link : It is best to chose Yes, but if you chose No also it's allright.
- Show compose Mode for all your blog : Chose Yes.
- Show transliteration button for your post : chose Yes if the you wanted to be button to change normally alphabet to hindi (India) alphabet, Chose No if being the reverse.
- Click Save Settings.
- Finish.
- Blog’Spot Address : Content with your blog address. Example : kolom-tutorial.
- Send Pings : Chose Yes.
- Click Save Settings.
- Finish.
5. Click Formatting to arrange the formatting menu.
- Show : Chose the number of post want you to display in your blog. Example : Show : 6 post, it's means your posting will display in your page Totally six posting. Chose Post (don't days) at pulldown menu
- Date header Format : Chose the style of date/month what you wanted, this date/month will display above your post.
- Archive Index Date Format : Chose the style for your archive
- Timestamp Format : Chose the style of the time, what you wanted.
- Time Zone : Chose the matching zone with your place. Example for WIB : [UTC+7.00] jakarta.
- Language : Chose language what you wanted.
- Convert line break : Chose Yes, but if you chose No it's allright.
- Show Link Field : Chose No, but if you chose Yes it's allright.
- Enable Float aligment : Chose Yes, but if you chose No it's allright.
- Click Save Settings.
- Finish.
6. Click Comment to arrange the Comment menu.
- Comments : Chose Show.
- Who Comment? Chose Anyone. It's means anyone can comment to your post.
- Comments Default for Post : Chose New post Have Comments
- Back links : Chose Show. It's means you will know if another people has linked to your post.
- Backlinks default for Posts : Chose New post have Backlinks.
- Show comments in a popup window? : Chose Yes. It's means when the people click Comment link your blog not lost.
- Show word verification for comments? : It's better to chose Yes
- Enable comment moderation? : Chose No, but if you wanted chose Yes it's allright.
- Show profile images on comments? : Chose Yes. It's means the photo of commentator of blogger member can display.
- Comment Notification Address : Content with your email address.
- Click SAVE SETTINGS.
- Finish.
7. Click ARCHIVING to arrange the archiving menu.
- Archive Frequency : Chose monthly.
- enable Post Pages? : Chose Yes.
- Click SAVE SETTINGS.
- Finish.
- Publish Site Feed : Chose Yes.
- Descriptions : Chose Full
- Article Footer : If you have advertising code like Google Adsense, you can insert the code here.
- Click SAVE SETTINGS.
- Finish.
Selasa, 05 Januari 2010
How to make a blog using blogspot
If we want to make a blog, we start to make an ordinary e-mail such as gmail first as an account. Then, please to register yourself in free blog provider such http://www.blogger.com. Click the picture below to register.
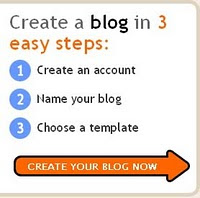

After we arrive in Blogger.com, you will see picture like shown above. Now, follow my instruction.
- Click an arrow sign, inscribed with “CREATE YOUR BLOG NOW”
- Complete the ‘e-mail address’ form, with your own e-mail address (of course with the valid one).
- Rewrite your e-mail address in form ‘retype e-mail address’
- Type the password as you wanted to. Type it in form, ‘enter a password’
- Retype your password in form ‘type password again’
- Type the password as you wanted to. Type it in form, ‘enter a password’
- Retype your password in form ‘type password again’
- Type the word which has shown, in form ‘word verification’. Click the white little square beside the sentence, ‘I accept the Terms of Service’.
- Click an arrow sign inscribed with “CONTINUE”
- Write the title of your blog that you desire (you can change it later) in form ‘Blog Title’
- Type the name of your site in form ‘Blog Address (URL)’ .
- Type verification word which shown in form ‘word verification’. After that, click an arrow image inscribed with word, ‘CONTINUE’.
- Choose one template that you wanted to (You can change it later, if you want), then click again an arrow sign inscribed with word ‘CONTINUE’.
- Wait a moment. After you meet a sentence ‘Your blog has been created’. Click an arrow sign (again) which inscribed with “BEGIN POSTING’. Feel please to fill up your blog with everything you want to. After you finish with your first posting, just click the sentence, ‘PUBLISH YOUR POSTING’, Please write What you want, if being finished then click of the publish button.
- It's Done.
Langganan:
Postingan (Atom)